Lately, I’ve been studying Data Engineering and Data Pipelines. I thought it would be interesting to share a bit of what I’m learning.
I wanted to create a simple proof of concept for a data pipeline that could be easily replicated in any environment using Docker, where I could set up the entire environment using Docker Compose and incorporate software engineering concepts using dbt.
Furthermore, one of the principles of this architecture is cost, so I researched those that offered the greatest simplicity and lowest possible cost. Thus, I chose to use Prefect as the pipeline orchestrator, dlt, and ClickHouse as the data warehouse to store the transformed data.
To make it a bit more challenging, I wanted to ingest data from an MS SQL Server database, which is a database I don’t usually work with day-to-day. The dataset would be about New York taxis, which is a public and well-known dataset in the data community.
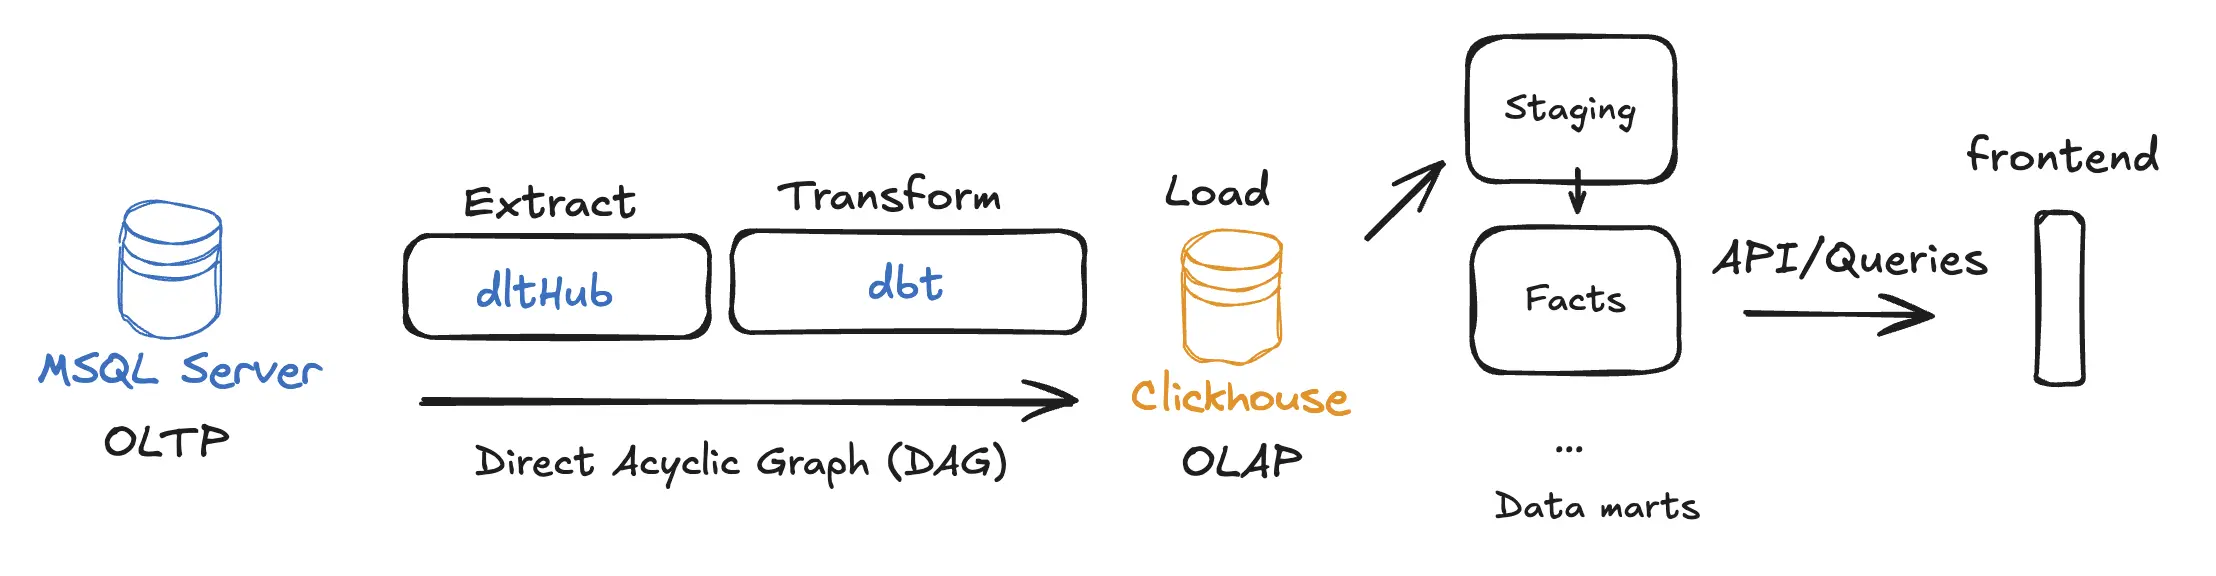
The solution’s architecture looks like this:
Create the environment with Docker Compose
The first step is to create the environment with Docker Compose, where I will start the source database. I created the docker-compose.yml file in the root folder of the project with the following content:
services: sqlserver: image: mcr.microsoft.com/mssql/server:2022-latest container_name: sqlserver environment: ACCEPT_EULA: 'Y' MSSQL_SA_PASSWORD: 'YourStrong!Passw0rd' ports: - '1433:1433' volumes: - sqlserverdata:/var/opt/mssqlThen I initialize the container:
docker-compose up -dImport data into SQL Server
I downloaded the data from the NYC Taxi & Limousine Commission (TLC) Trip Record Data through this link, and saved the file in the dataset folder of my project.
To import the .bak backup file into the SQL Server container, I use the following command:
docker cp ./dataset/NYCTaxi_Sample.bak sqlserver:/var/opt/mssql/data/NYCTaxi_Sample.bakNext, I execute the database restore command:
docker exec -it sqlserver /opt/mssql-tools18/bin/sqlcmd \ -S localhost -U sa -P 'YourStrong!Passw0rd' -C \ -Q 'RESTORE DATABASE NYCTaxi_Sample FROM DISK = "/var/opt/mssql/data/NYCTaxi_Sample.bak" WITH MOVE "NYCTaxi_Sample" TO "/var/opt/mssql/data/NYCTaxi_Sample.mdf", MOVE "NYCTaxi_Sample_log" TO "/var/opt/mssql/data/NYCTaxi_Sample_log.ldf"'Create project structure
Now that the database is ready, I will create the project structure with the tools I will use: DLT, ClickHouse, dbt, and Prefect.
First, I organize the project folder structure:
data-engineer/├── dataset/ # Raw data backups├── nyc_taxi/│ ├── main_flow.py # Prefect orchestrator│ ├── extract_sqlserver.py # DLT ingestion logic│ └── nyc_taxi_dbt/ # dbt project│ ├── models/ # SQL Transformation models│ └── profiles.yml # dbt connection settings└── docker-compose.yaml # Infrastructure definitionInside the nyc_taxi folder, I create the Python virtual environment and install the necessary dependencies using UV. UV is a dependency and virtual environment management tool for Python projects built in Rust (I highly recommend checking it out).
brew install uvThen, I initialize the UV environment:
uv init nyc_taxiI add the project dependencies:
uv add dbt-core dbt-sqlserver dbt-clickhouse prefect prefect-clientNext, create the dbt project:
Configure dbt
Dbt (Data Build Tool) is a data transformation tool that allows data engineers and analysts to transform, test, and document data in their data warehouses. To create the Dbt project, I navigate to the nyc_taxi folder and run the command:
cd nyc_taxidbt init nyc_taxi_dbtMy dbt_project.yml file looks like this:
# Name your project! Project names should contain only lowercase characters# and underscores. A good package name should reflect your organization's# name or the intended use of these modelsname: 'nyc_taxi_dbt'version: '1.0.0'
# This setting configures which "profile" dbt uses for this project.profile: 'nyc_taxi_clickhouse'
# These configurations specify where dbt should look for different types of files.# The `model-paths` config, for example, states that models in this project can be# found in the "models/" directory. You probably won't need to change these!model-paths: ['models']analysis-paths: ['analyses']test-paths: ['tests']seed-paths: ['seeds']macro-paths: ['macros']snapshot-paths: ['snapshots']
clean-targets: # directories to be removed by `dbt clean` - 'target' - 'dbt_packages'
# Configuring models# Full documentation: https://docs.getdbt.com/docs/configuring-models
# In this example config, we tell dbt to build all models in the example/# directory as views. These settings can be overridden in the individual model# files using the `{{ config(...) }}` macro.models: nyc_taxi_dbt: # Config indicated by + and applies to all files under models/example/ example: +materialized: viewI configure the ~/.dbt/profiles.yml file to connect to ClickHouse:
nyc_taxi_clickhouse: target: dev outputs: dev: type: clickhouse host: localhost port: 8123 user: default password: password schema: nyc_taxi threads: 4You can test if the dbt project is working correctly by running the command:
uv run dbt debugConfigure dbt models
I will create the dbt models to transform the data. I create the necessary folders and files inside the nyc_taxi/nyc_taxi_dbt/models/ folder:
data-engineer/├── nyc_taxi/│ └── nyc_taxi_dbt/ # dbt project│ └── models/ # SQL Transformation models│ ├── staging/│ │ ├── sources.yml│ │ └── stg_nyctaxi_sample.sql│ └── marts/│ └── fact_nyctaxi_trips.sqlThe sources.yml file defines the data source:
version: 2
sources: - name: clickhouse_staging database: nyc_taxi tables: - name: nyctaxi_sample identifier: nyc_taxi_staging___nyctaxi_sampleThe stg_nyctaxi_sample.sql file creates the staging table:
{{ config(materialized='view') }}
with source as ( select * from {{ source('clickhouse_staging', 'nyctaxi_sample') }}),
renamed as ( select medallion, hack_license, vendor_id, rate_code, store_and_fwd_flag, pickup_datetime, dropoff_datetime, passenger_count, trip_time_in_secs, trip_distance, pickup_longitude, pickup_latitude, dropoff_longitude, dropoff_latitude, payment_type, fare_amount, surcharge, mta_tax, tolls_amount, total_amount, tip_amount, tipped, tip_class, _dlt_load_id, _dlt_id from source)
select * from renamedThe fact_nyctaxi_trips.sql file creates the fact table:
{{ config( materialized='incremental', engine='ReplacingMergeTree', order_by=['medallion', 'hack_license', 'pickup_datetime'], unique_key='_dlt_id', incremental_strategy='append') }}
-- ReplacingMergeTree handles duplicates automatically based on the ORDER BY keys-- when merges happen. In dbt-clickhouse, 'incremental' with 'append' is often used-- with ReplacingMergeTree to let the engine handle deduplication.
with staging as ( select * from {{ ref('stg_nyctaxi_sample') }} {% if is_incremental() %} where pickup_datetime > (select max(pickup_datetime) from {{ this }}) {% endif %})
select * from stagingThe reason for using ReplacingMergeTree is that it allows ClickHouse to automatically manage the replacement of duplicate records based on the defined primary key (in this case, medallion, hack_license, and pickup_datetime). This is especially useful for incremental load scenarios where new data might contain updates or corrections for existing records.
Additionally, I split it into staging and marts to follow the best practices of dbt project organization, where raw data is first loaded into staging tables before being transformed into fact or dimension tables.
If you want to learn more about modeling strategies like dimensions and facts, you can read this article.
So, illustrating the data flow, it would be:
[Raw Data in ClickHouse] --> [StagingTable: stg_nyctaxi_sample] --> [FactTable: fact_nyctaxi_trips]With this, I finish the dbt configuration. We can test the models by running the command:
uv run dbt runConfigure Docker Compose for ClickHouse and Prefect
Now I will add the ClickHouse and Prefect services to the docker-compose.yml file:
services: sqlserver: # Below the already created SQL Server service clickhouse: image: clickhouse/clickhouse-server container_name: clickhouse environment: CLICKHOUSE_USER: default CLICKHOUSE_PASSWORD: password CLICKHOUSE_DB: nyc_taxi CLICKHOUSE_DEFAULT_ACCESS_MANAGEMENT: 1 ports: - '8123:8123' - '9000:9000' volumes: - clickhousedata:/var/lib/clickhouse prefect: image: prefecthq/prefect:3-python3.12 container_name: prefect environment: PREFECT_SERVER_API_HOST: 0.0.0.0 command: prefect server start --no-services ports: - '4200:4200' volumes: - prefectdata:/var/lib/prefectvolumes: sqlserverdata: clickhousedata: prefectdata:Let’s start the ClickHouse and Prefect containers:
docker-compose up -d clickhouse prefectCreate the orchestration flow with Prefect
Now I will create the orchestration flow using Prefect. I create the main_flow.py file inside the nyc_taxi folder with the following content:
import loggingfrom prefect import flow, taskfrom extract_sqlserver import load_sql_server_to_clickhousefrom prefect_dbt import PrefectDbtRunner, PrefectDbtSettings
# Configure logginglogging.basicConfig(level=logging.INFO)logger = logging.getLogger(__name__)
@task(retries=3, retry_delay_seconds=60)def extract_task(): logger.info("Starting extraction task...") load_sql_server_to_clickhouse() logger.info("Extraction task completed.")
@taskdef dbt_run_task(): logger.info("Starting dbt run task...") result = PrefectDbtRunner( settings=PrefectDbtSettings( project_dir="nyc_taxi_dbt", profiles_dir="nyc_taxi_dbt" ) ).invoke(["build"]) logger.info("dbt run task completed.")
@taskdef data_quality_checks(): logger.info("Running data quality checks...") # This could be more dbt tests or custom SQL checks # For now, we'll assume dbt build (which includes tests) covers this. logger.info("Data quality checks passed.")
@flow(name="nyc_taxi_etl")def nyc_taxi_pipeline(): extract_task() dbt_run_task() data_quality_checks() # Alerting can be handled by Prefect's native automation or state handlers logger.info("Pipeline completed successfully.")
if __name__ == "__main__": nyc_taxi_pipeline.serve(name="nyc_taxi_pipeline", cron="0 */12 * * *")Next, I create the extract_sqlserver.py file with the logic to extract data from SQL Server to ClickHouse:
import loggingimport dltfrom dlt.sources.sql_database import sql_database
def load_sql_server_to_clickhouse(): # Configure logging to see what's happening logging.basicConfig(level=logging.INFO, format='%(asctime)s - %(levelname)s - %(message)s') logger = logging.getLogger(__name__)
logger.info("Starting SQL Server to ClickHouse extraction...") # Configure the destination: ClickHouse # dlt will automatically pick up credentials from .dlt/secrets.toml pipeline = dlt.pipeline( pipeline_name="sql_server_to_clickhouse", destination="clickhouse" )
# Define the source with incremental logic # dlt will automatically pick up credentials for sql_database from .dlt/secrets.toml source = sql_database().with_resources("nyctaxi_sample")
# Configure incremental loading and primary keys for the resource # To use ReplacingMergeTree in ClickHouse, we need a primary key. # medallion + hack_license + pickup_datetime seem like a good candidate for a unique key in this sample. source.nyctaxi_sample.apply_hints( incremental=dlt.sources.incremental("pickup_datetime"), primary_key=["medallion", "hack_license", "pickup_datetime"] )
# Run the pipeline # Use 'merge' to support updates/CDC and trigger ReplacingMergeTree. info = pipeline.run(source, write_disposition="merge")
print(info)
if __name__ == "__main__": load_sql_server_to_clickhouse()With this, let’s run the orchestration flow inside the nyc_taxi folder where the UV virtual environment is located:
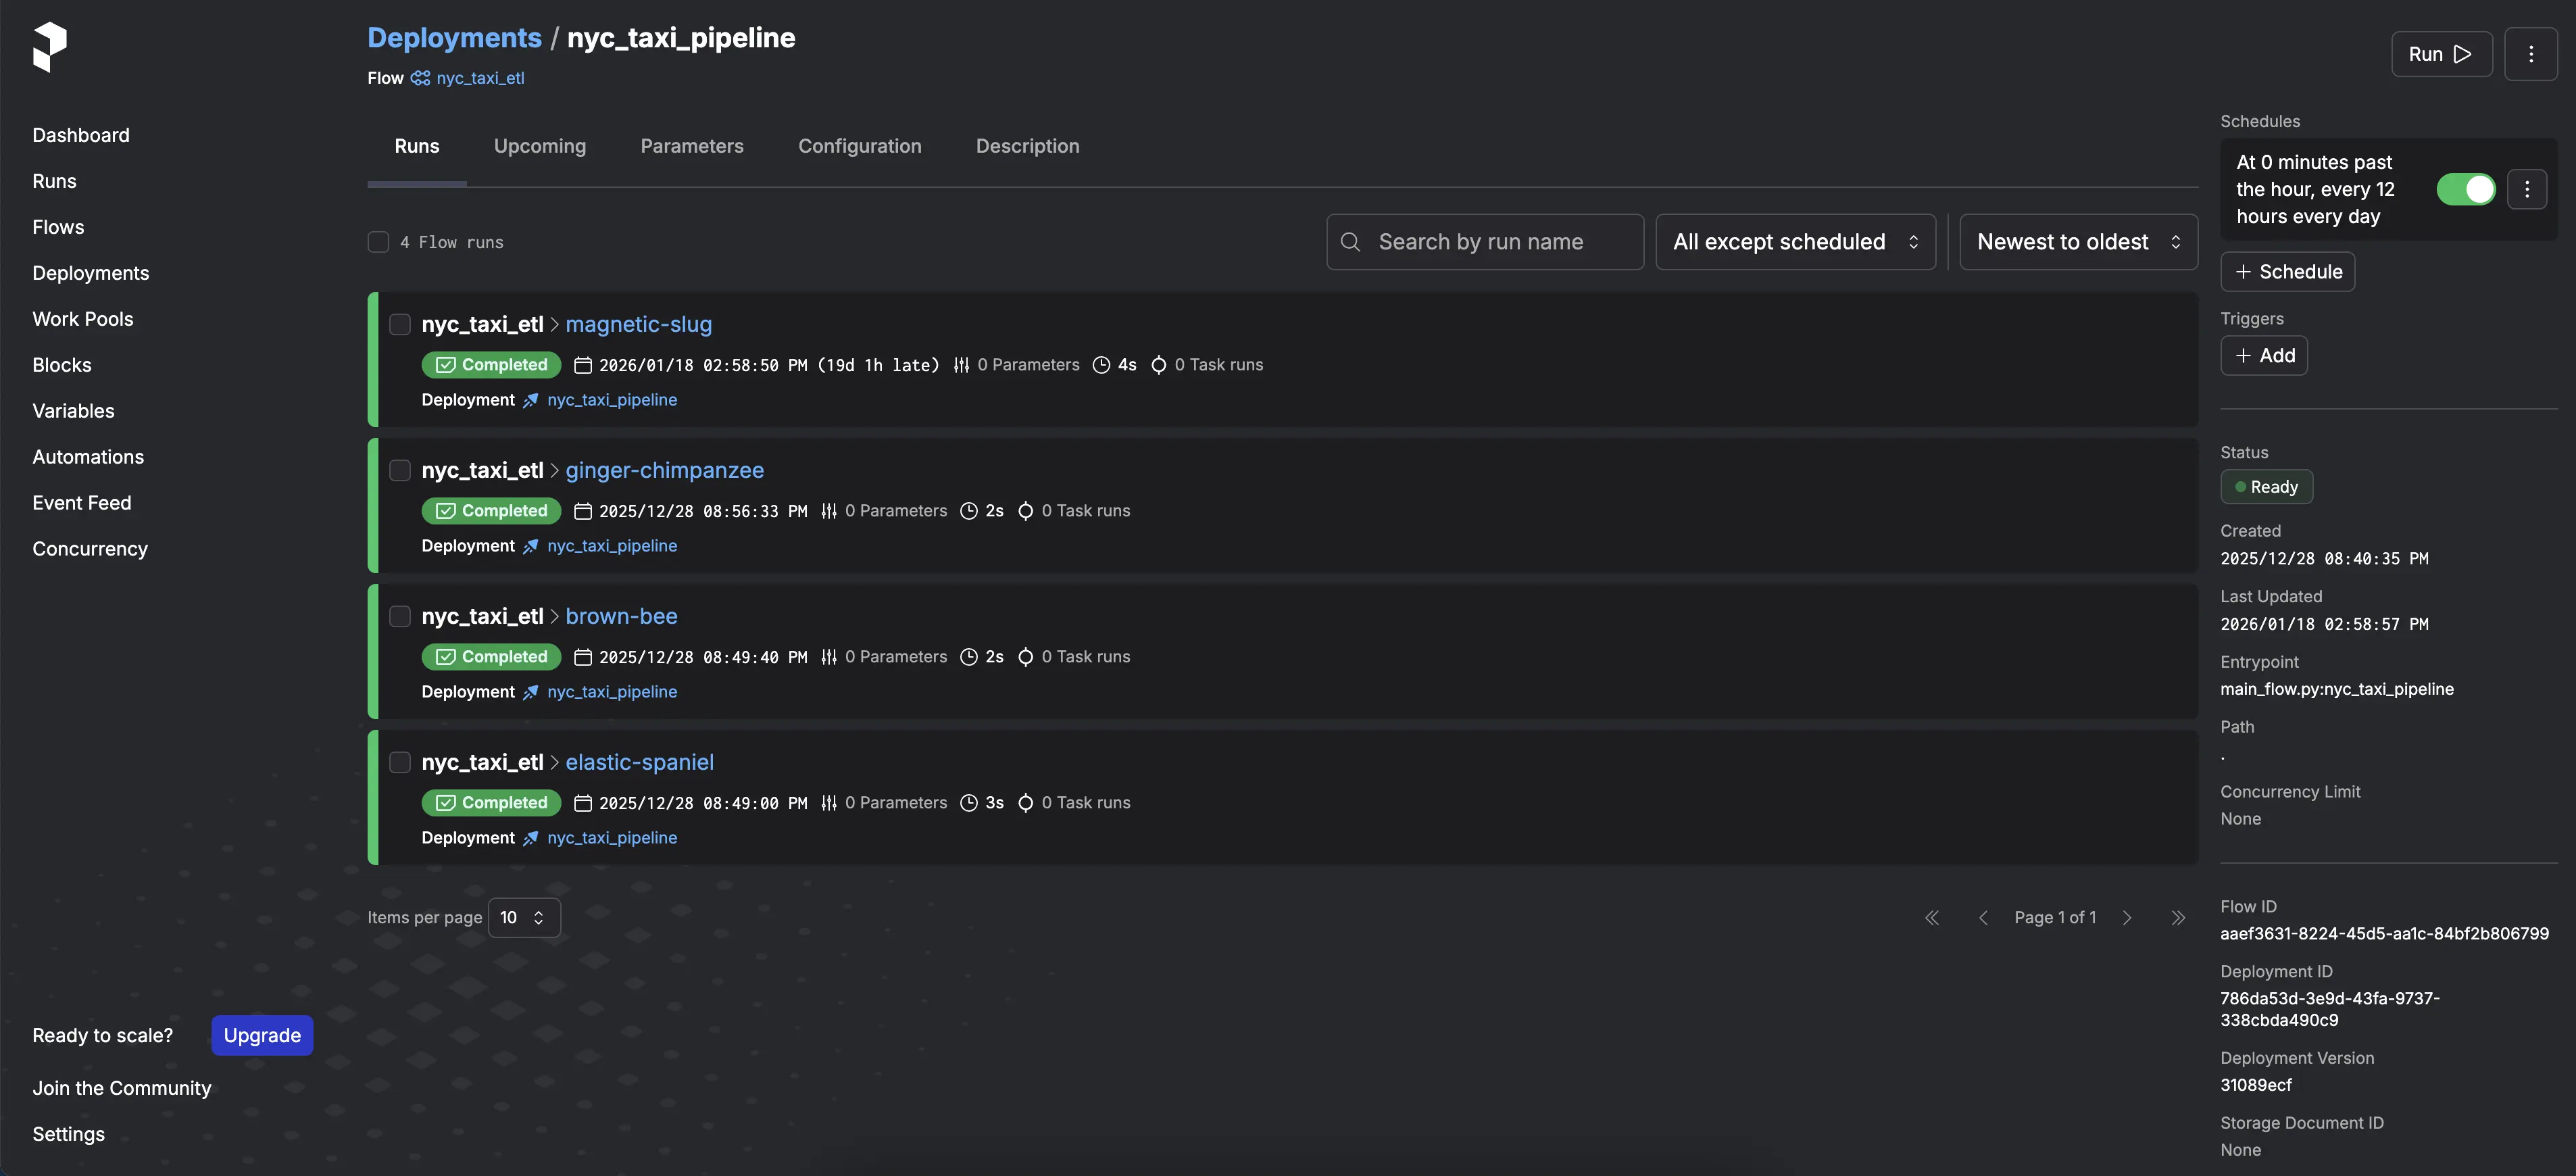
cd nyc_taxiuv run python main_flow.pyYou can monitor the flow execution by accessing the Prefect dashboard at http://localhost:4200.
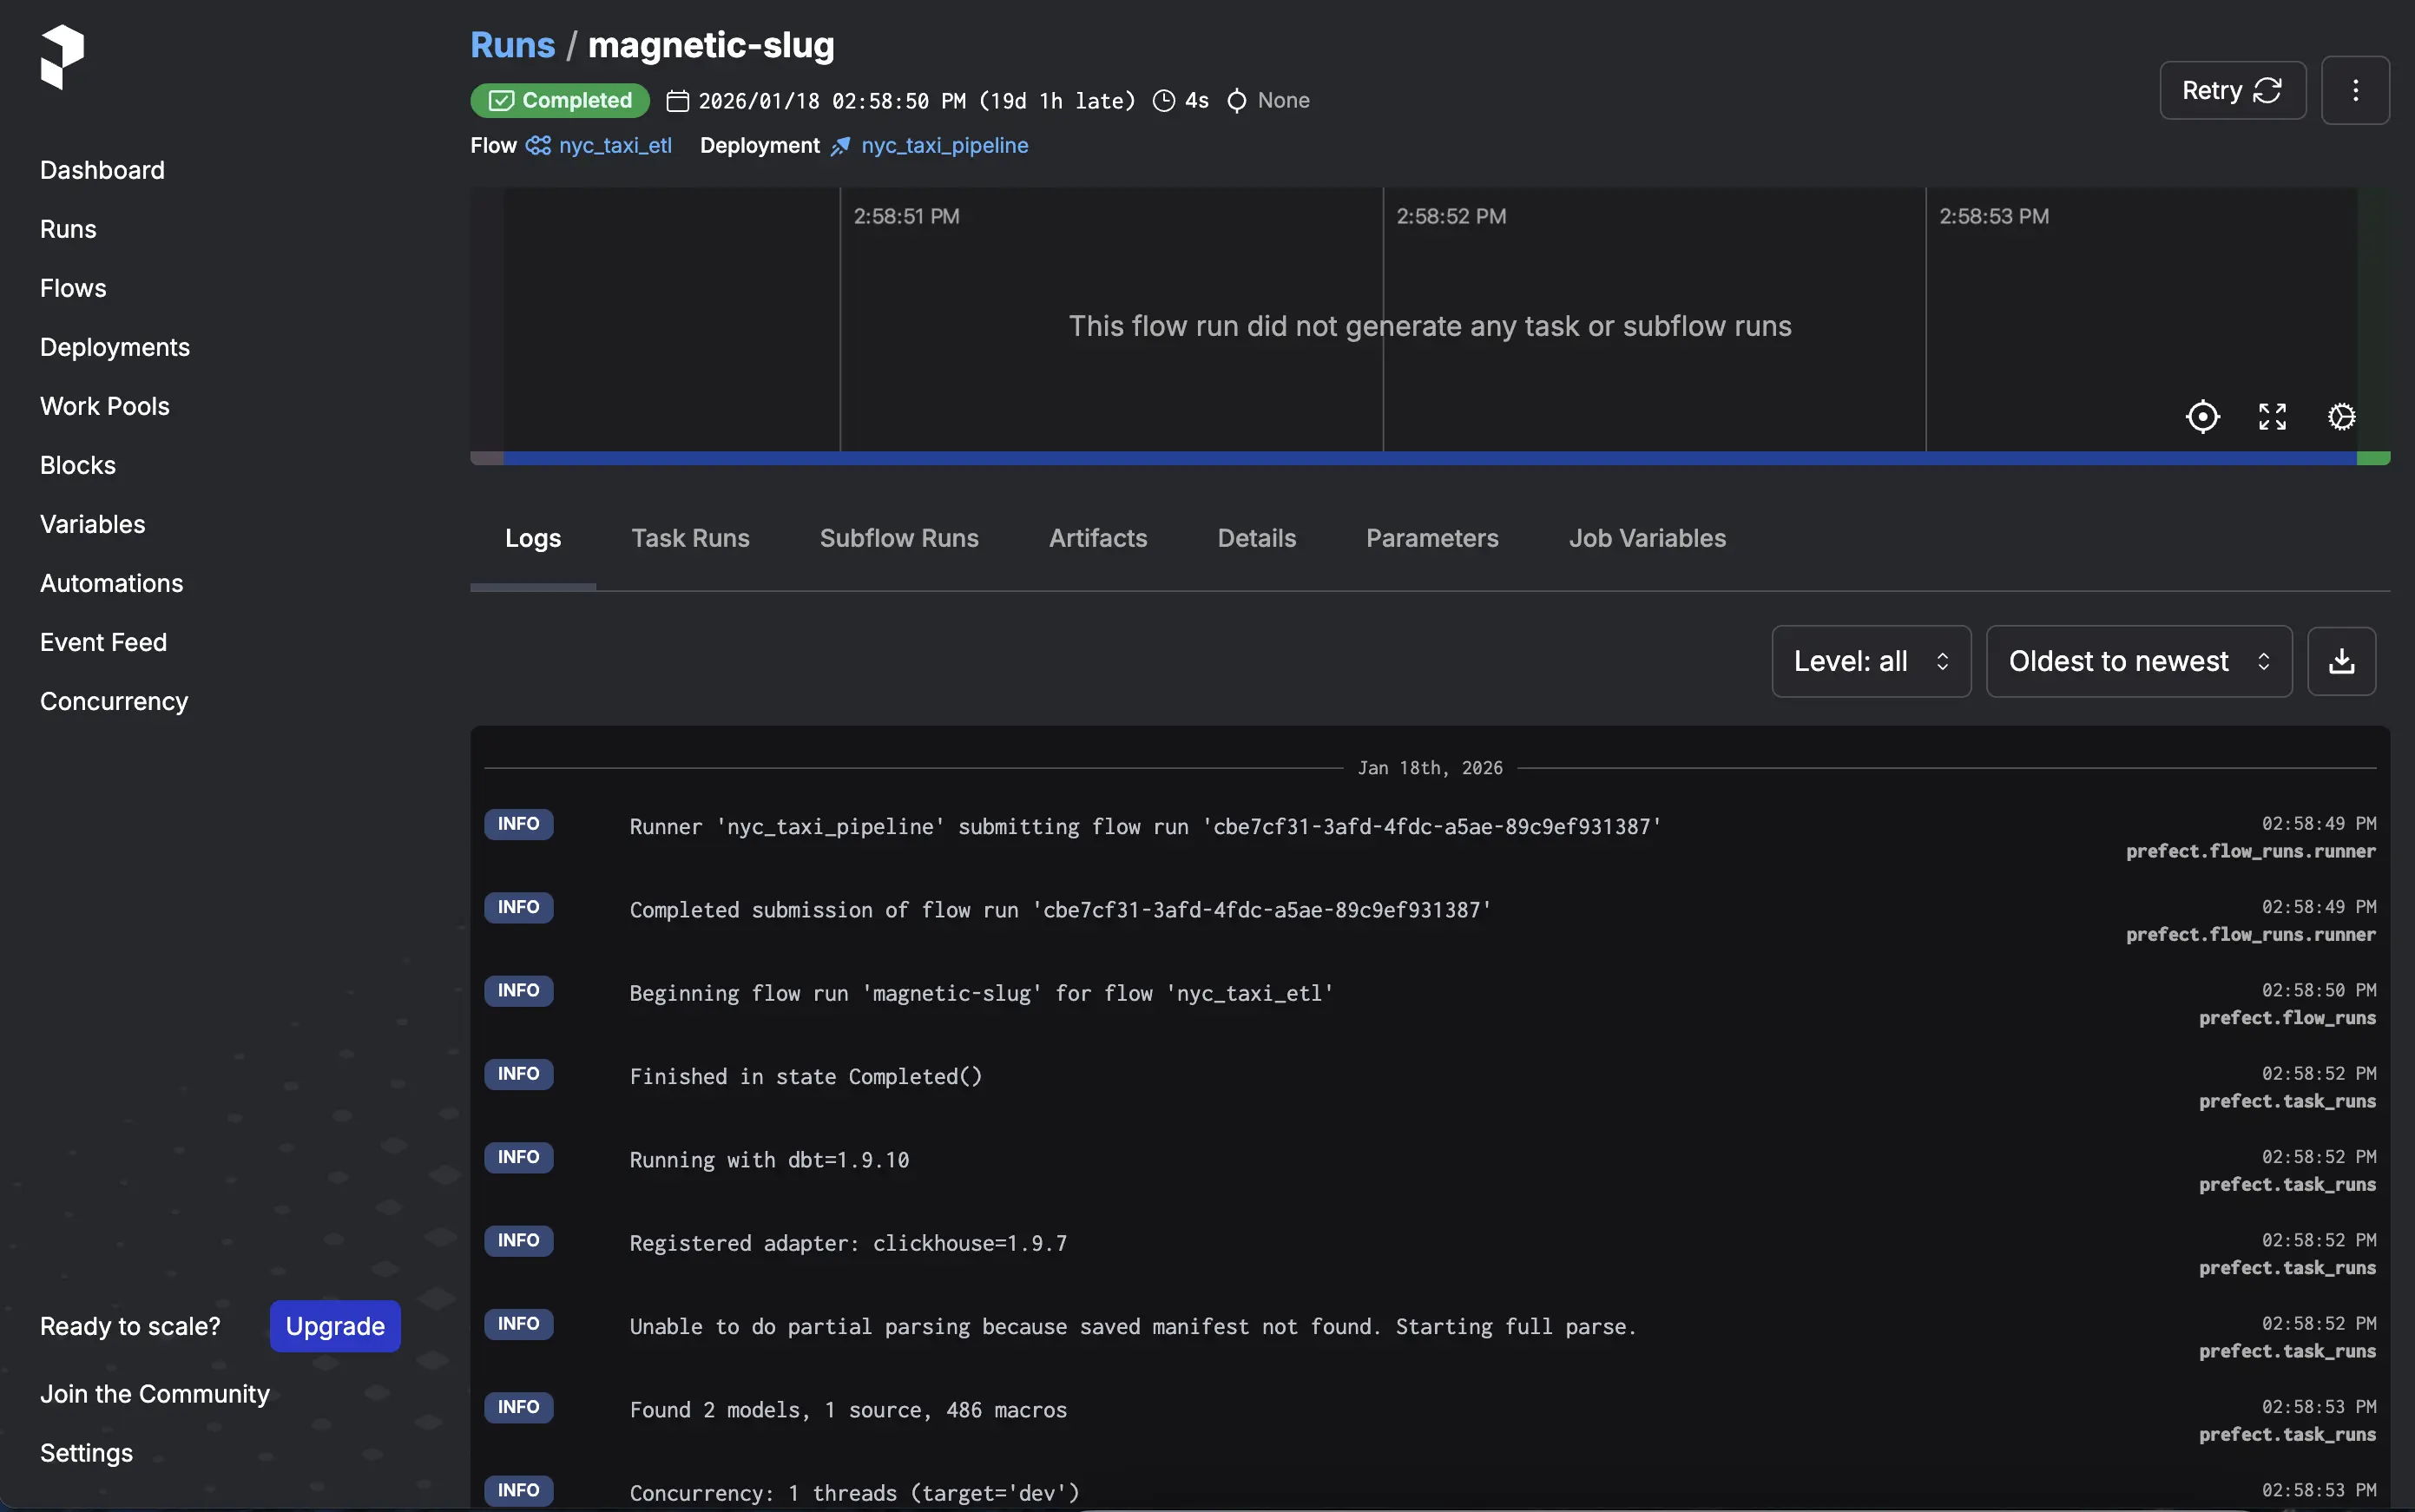
In the flow logs, you will see the data extraction, transformation, and loading steps:
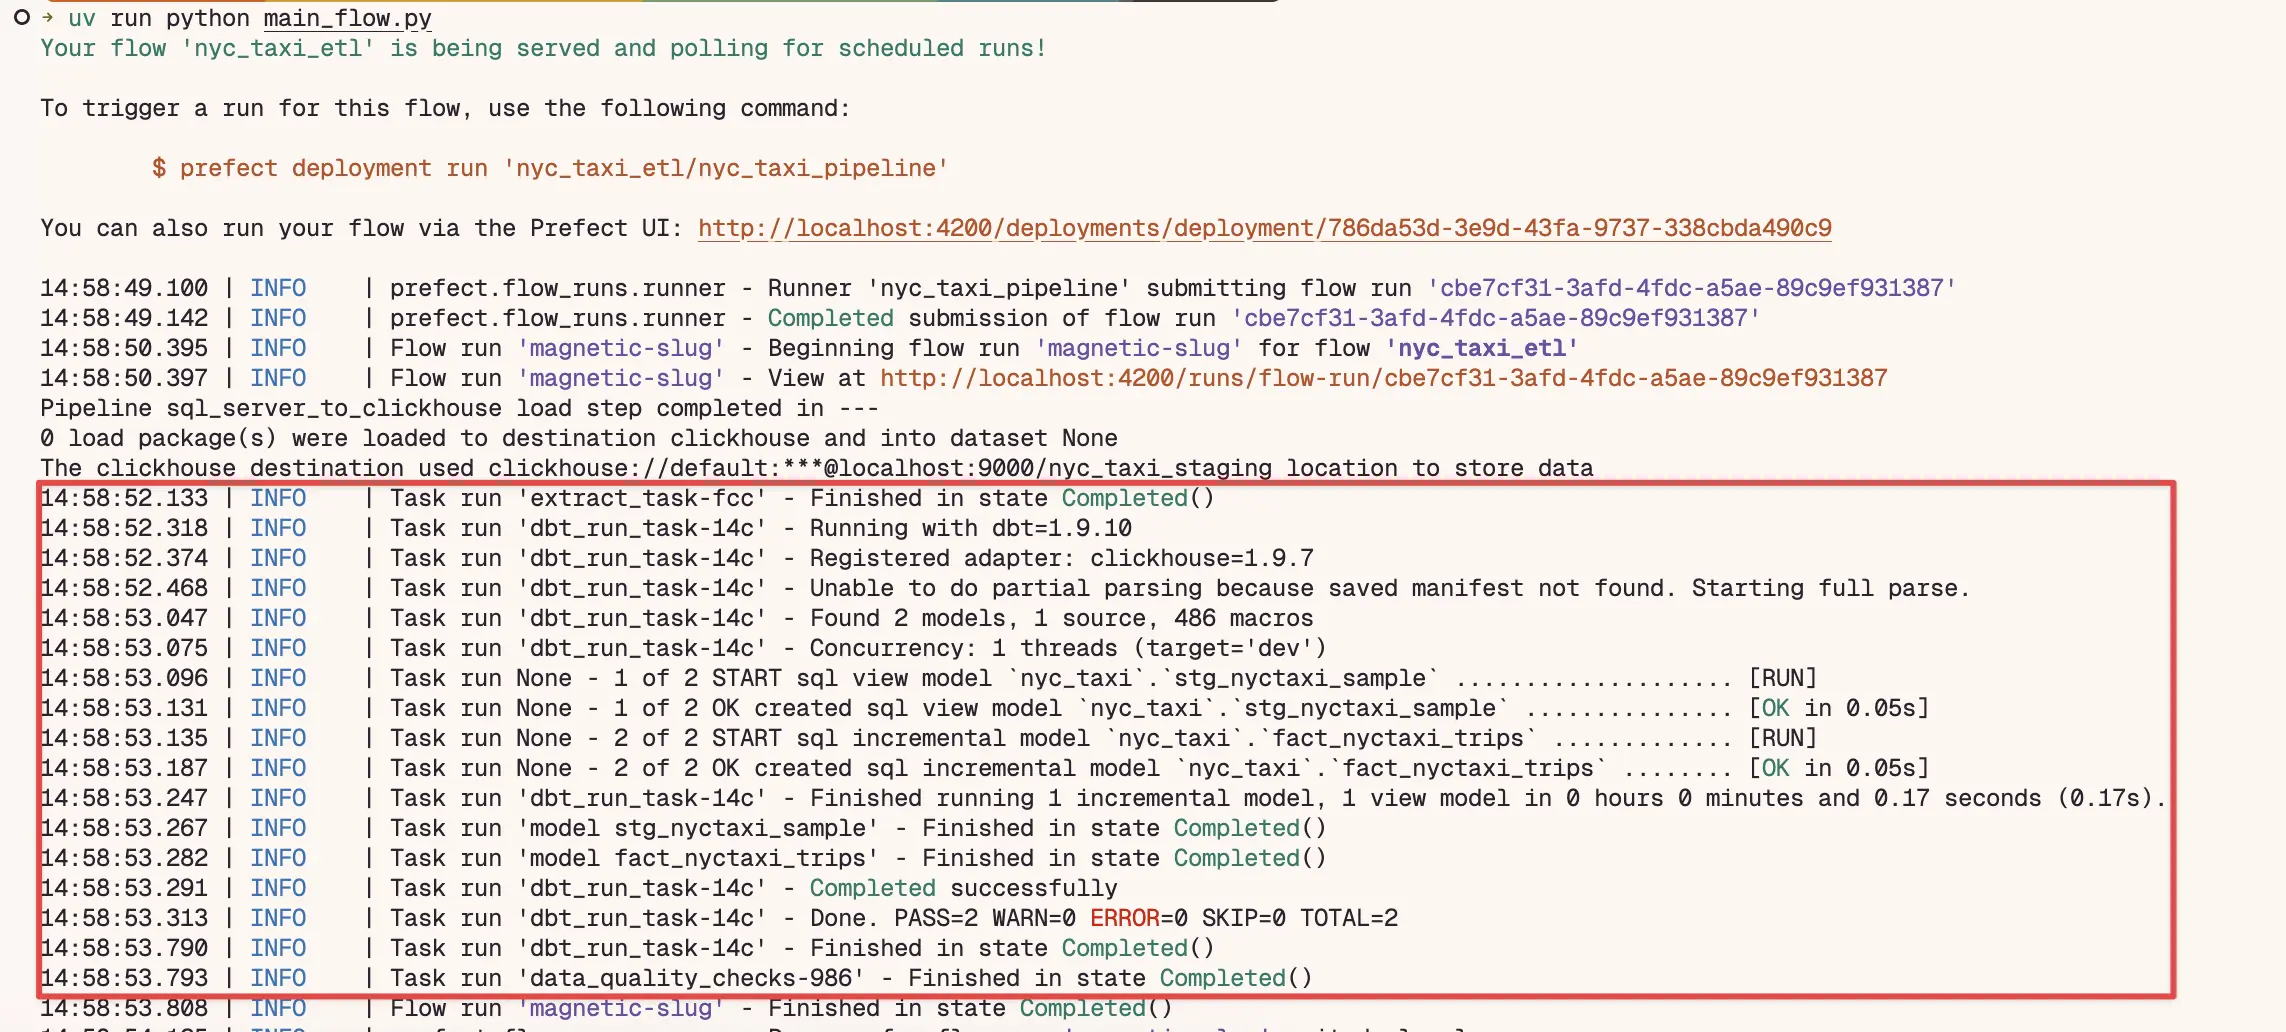
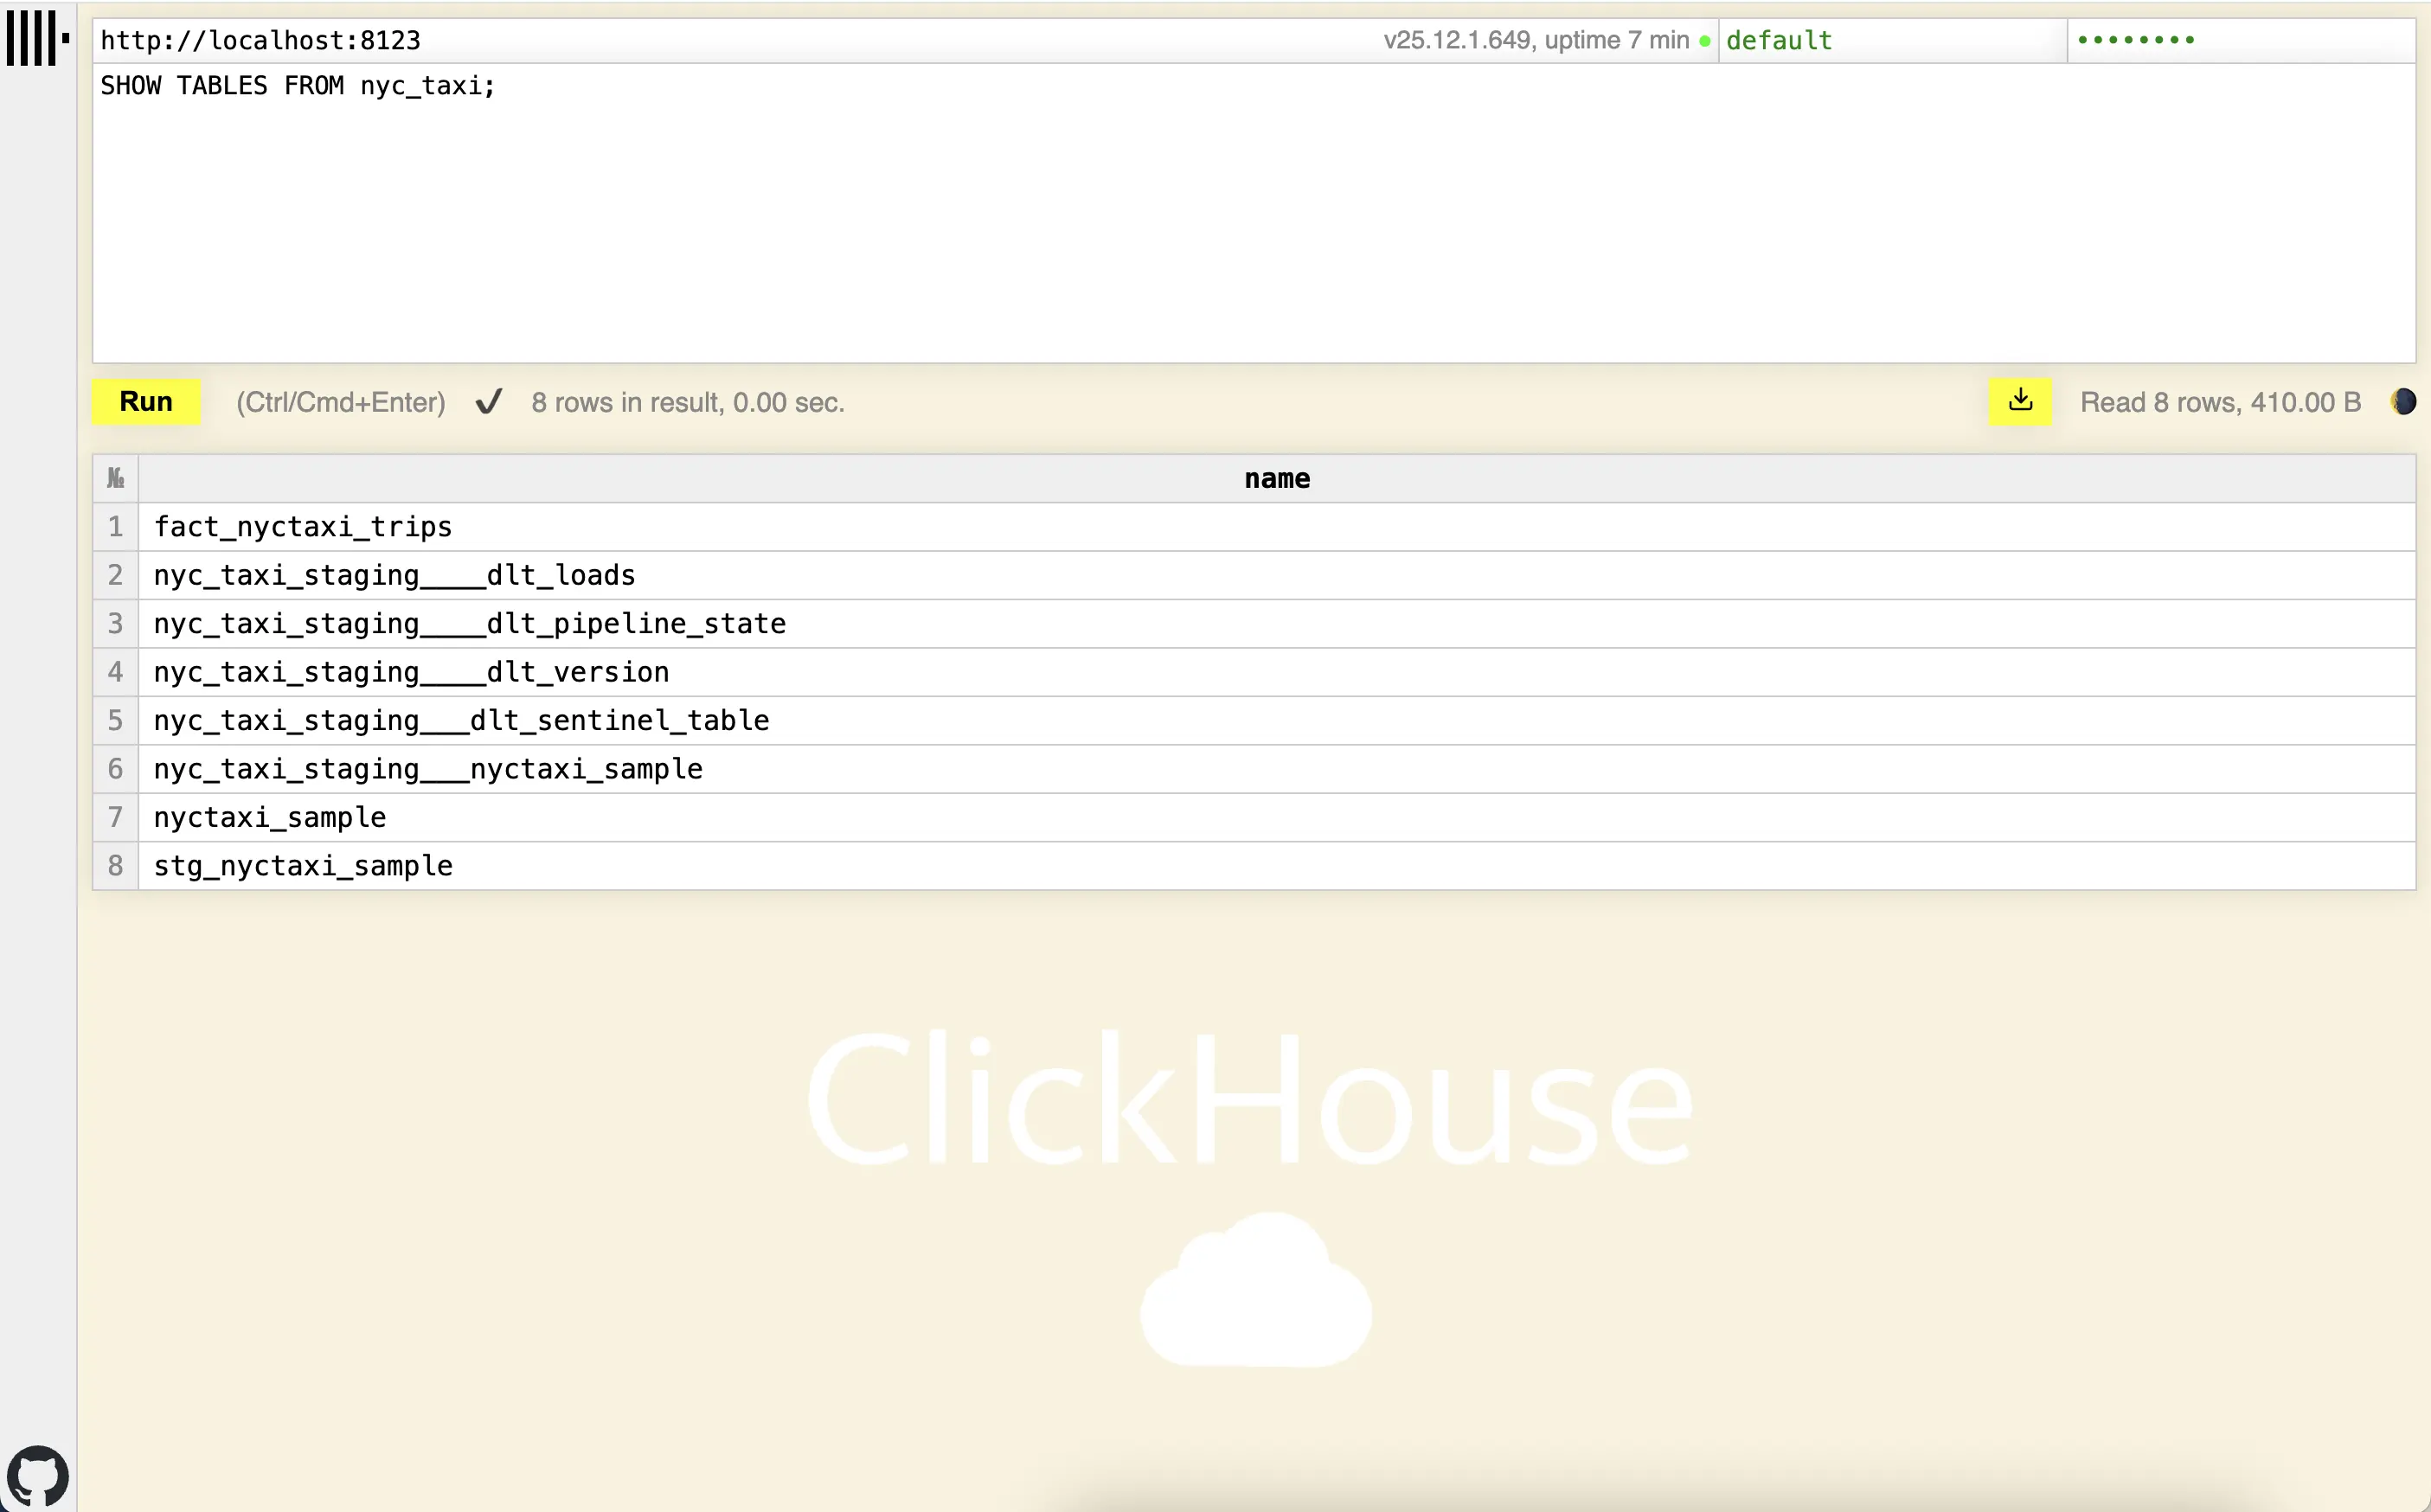
You can check the data loaded into ClickHouse using the web client at http://localhost:8123 or any SQL query tool compatible with ClickHouse.
Here you can see the fact table fact_nyctaxi_trips created in ClickHouse:
Configure ClickHouse UI
To facilitate data visualization in ClickHouse, you can use ClickHouse UI.
Let’s add the ClickHouse UI service to the docker-compose.yml file:
ch-ui: image: ghcr.io/caioricciuti/ch-ui:latest restart: always ports: - '5521:5521' environment: # Core ClickHouse Configuration VITE_CLICKHOUSE_URL: 'http://localhost:8123' VITE_CLICKHOUSE_USER: 'default' VITE_CLICKHOUSE_PASS: 'password'
# Optional: Advanced Features VITE_CLICKHOUSE_USE_ADVANCED: 'false' VITE_CLICKHOUSE_CUSTOM_PATH: '' VITE_CLICKHOUSE_REQUEST_TIMEOUT: '30000'
# Optional: Reverse Proxy Support VITE_BASE_PATH: '/'Then, I start the ClickHouse UI container:
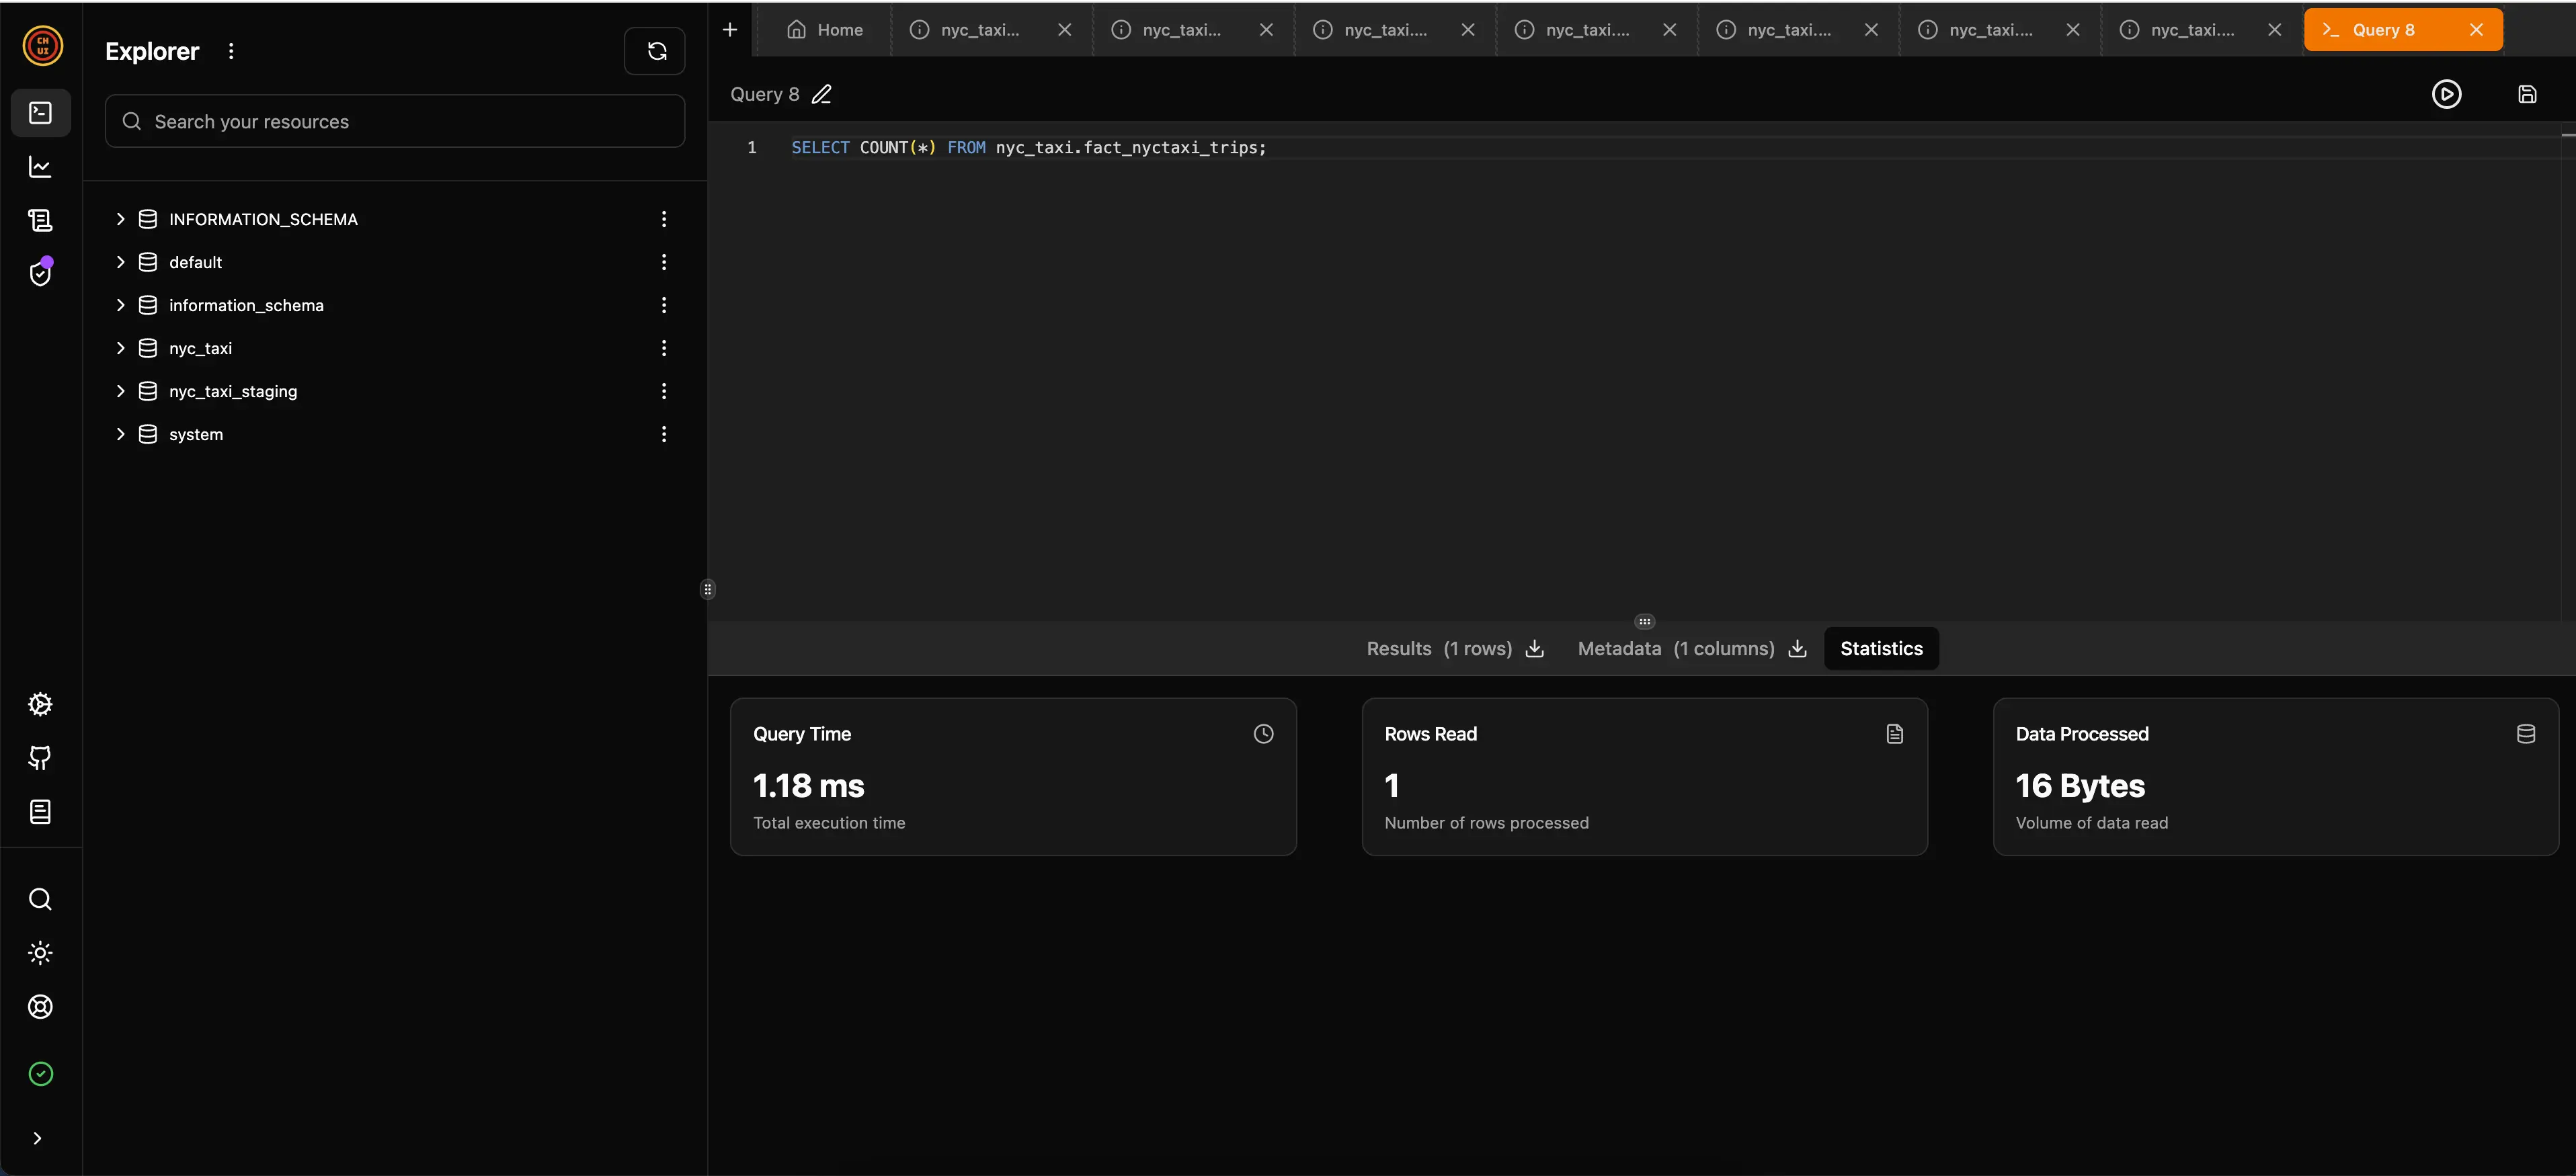
docker-compose up -d ch-uiYou can access the ClickHouse UI interface at http://localhost:5521 to explore the loaded data. In the image below, you can see that I ran a query on the fact_nyctaxi_trips fact table to count all recorded trips, and it took only 1.18ms for the 1,703,957 records loaded. It’s very fast!:
Conclusion
It is very rewarding to see how all these tools can work together to create an efficient and scalable data pipeline. The use of DLT for ingestion, dbt for transformation, Prefect for orchestration, and ClickHouse as a data warehouse provides a robust and high-performance solution that can be easily replicated in different environments thanks to Docker Compose.
There are other orchestration tools like Dagster or Airflow, but I chose Prefect for its simplicity and ease of use, as well as its execution being carried out in the codebase itself.
Additionally, for data ingestion, there is Airbyte, but I chose DLT because it offers a modern, efficient approach and utilizes Apache Arrow, especially when combined with ClickHouse, which is known for its speed and ability to handle large volumes of data.
Regarding dbt, I could have used dbt fusion, which is a new version developed in Rust that utilizes Apache Arrow, but it is still in beta, so I opted for traditional dbt.
Apache Arrow is a powerful technology that is gaining more and more space in the data ecosystem, and it is interesting to see how it is being integrated into various modern data engineering tools.
The Arrow format is a better way to represent tabular data in memory than native Python objects (list of dictionaries). It allows offloading processing to Arrow’s fast C++ library and avoids row-by-row processing. If you are interested in understanding more about it, I recommend this video.
You can check the repository with all the code used in this project on my GitHub, in addition to finding examples using Airflow and Dagster: data-engineer-dlt-dbt-prefect-clickhouse
References:
- NYC Taxi demo data for SQL Server Python and R tutorials
- Code along - build an ELT Pipeline in 1 Hour (dbt, Snowflake, Airflow)
- Dbt docs
- Dlthub docs
- Moving away from Segment to a cost-effective do-it-yourself event streaming pipeline with Cloud Pub/Sub and dlt.
- The Hidden Costs of Running Apache Airflow
- Airflow Local Development Sucks
- Prefect docs
- ClickHouse docs